Project1 - Arduino Barcode & QR Code Reader

1. What You Will Build
In this tutorial, you will learn how to build Project1 - Arduino Barcode & QR Code Reader using Arduino .
By the end of this tutorial, your project will be able to:
Read data from a barcode/QR scanner using SoftwareSerial.
Detect whether the scanned data is a QR Code or a Barcode.
Display categorized scan results on the Serial Monitor.
2. What You Will Learn
After completing this tutorial, you should understand:
How to connect a barcode/QR scanner to Arduino Uno.
How to read serial data using SoftwareSerial.
How to process and analyze scanned data.
How the code works step by step
3. Components Needed
No. | Component | Quantity |
1 | Arduino | 1 |
2 | 5V barcode/QR Scanner | 1 |
3 | Jumper wires | several |
4 | Breadboard | 1 |
5 | USB cable | 1 |
4. Software Needed
Use the tools below depending on your board.
Board | Software |
Arduino | Arduino IDE |
Libraries Needed
No libraries needed.
5. Circuit Connection
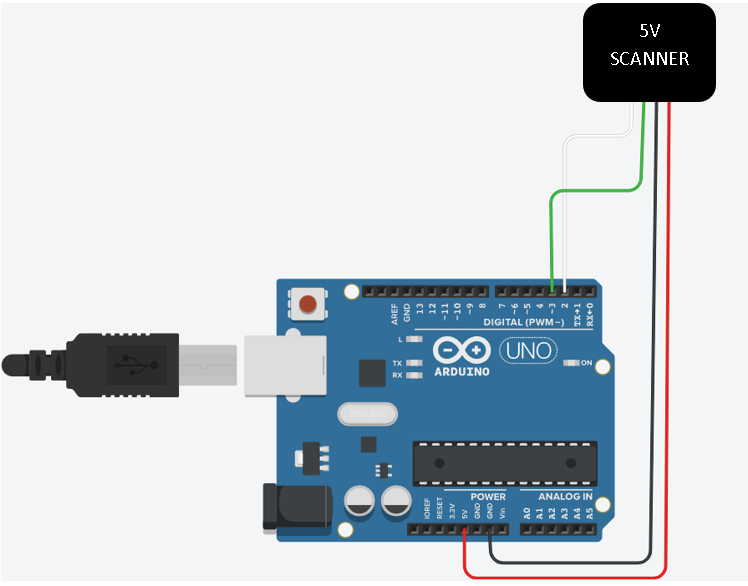
Connect the components as shown below.
Component Pin | Connect To |
VCC | 5V |
GND | GND |
TX (white) | GPIO 2 |
RX(green) | GPIO 3 |
Wiring Steps
Connect VCC of 5V barcode/QR Scanner to 5V on the board.
Connect GND of 5V barcode/QR Scanner to GND on the board.
Connect RX pin to GPIO 3.
Connect TX pin to GPIO 2.
Double-check all wiring before powering the board.
Circuit Diagram
6. Code
#include <SoftwareSerial.h>

SoftwareSerial scanner(2, 3);

String data = "";

void setup() {
  Serial.begin(9600);
  scanner.begin(9600);

  Serial.println("Scanner Ready");
}

void loop() {

  while (scanner.available()) {

    char c = scanner.read();

    if (c == '\n' || c == '\r') {

      if (data.length() > 0) {

        String d = data;
        d.trim();

        // ===== DETECTION LOGIC =====
        if (d.startsWith("http")) {
          Serial.print("QR Code Scanned (URL): ");
        }
        else if (d.length() > 60) {
          Serial.print("QR Code Scanned (DuitNow/Long QR): ");
        }
        else {
          bool onlyNumber = true;

          for (int i = 0; i < d.length(); i++) {
            if (!isDigit(d[i])) {
              onlyNumber = false;
              break;
            }
          }

          if (onlyNumber && d.length() <= 13) {
            Serial.print("Barcode Scanned (Numeric): ");
          }
          else {
            Serial.print("Barcode Scanned (Alphanumeric): ");
          }
        }

        Serial.println(d);
        data = "";
      }

    } else {
      data += c;
    }
  }
}
7. Upload / Run the Project
Connect the board to your computer using USB.
Open the code in Arduino IDE.
Select the correct board.
Select the correct port.
Click Upload.
Open the Serial Monitor if needed.
8. Expected Result
When the project is working correctly:
The Serial Monitor will display “Scanner Ready” when the Arduino starts.
Every scanned data will be automatically detected and labeled.
9. Troubleshooting
Problem | Possible Fix |
Board not detected | Check USB cable, driver, board, and port selection |
Code upload failed | Select the correct board and COM port |
Barcode scanner not working | Check VCC, GND, TX, and RX wiring |
No data displayed | Verify the baud rate (9600) and Serial Monitor baud rate |